Search

Tuesday 26 February 2019

IABSM - Eastern Front WWII - Lardiarz


IABSM - Eastern Front WWII - Lardiarz

This was a scenario adapted from "Near Vchena" in the Bashnya or Bust campaign booklet. It delivered another cracking engagement, with the momentum swinging back and forth throughout. Excellent company and a game well played.

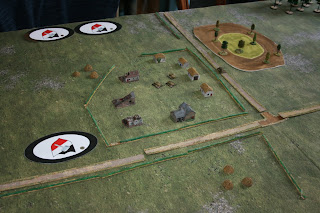
August 1944 and Operation Bagration is underway. We joined a desperate campaign along the fertile Bashnya and Chera valley in Lithuania. The full backstory is in the main booklet. This scenario featured a rapid counter-attack by German forces of the 30th Panzer and Panzergrenadier Regiments which aimed to capture a strategic road junction at Lardiarz (which would lead to them cutting the supply-lines back to Vcheva.) The Soviets had rushed up a combined-arms force to plug the gap and contest the T-junction. Both had the same objective: victory to the side that ended the game with infantry on or nearest the junction. The paunchy village of Lardiarz consisted of a group of shabby dwellings and a somewhat dilapidated church. It was surrounded by dense woods that were impassible to wheeled vehicles and even slowed Blinds. The Russians began with their scout infantry and armoured cars on the table (optionally on Blinds) and the Germans began with a solitary Puma on the table on Blinds. The OOBs were broadly comparable, with a random selection of reserves available, but the Germans could rely on better quality tanks and NCOs on the whole.


We diced off for sides, with John landing the canny German forces and the plucky Soviets being led by Charley and Mike. 


Hmmm. Where oh where to deploy the Scouts and those outdated Armoured Cars? The Soviets plumped for the limited cover and spotting advantages of the rather tasteless orange-walled Church (it's my paint-job so I can be critical ...)


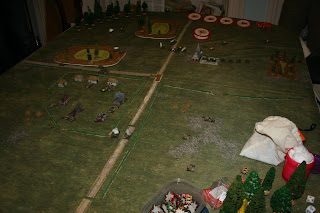
German blinds zip across the table. An assault-rifle zug seized the village but was spotted. The Puma, commanded by a Big Man called Spatz, pootled towards the crossroads and spotted the advanced vzvod of Russian T34-85s (below).


Leytenant Peykachu in the Armoured Scout Cars spotted the Panthers (mid-left) and the Sturm zug in the village. Handy. But this was worrying for the Soviets whose Blinds chip didn't show for several turns. We added a House rule involving command chips - a bit like SP2 - which allowed limited deployment, bonus turns etc. 
This photo features the obligatory "wargamer's lower midriff and crotch shot"


Where's Spatz (in the Puma)? He'd reversed down the road and was hiding under a Blind. Meanwhile, Tiger I's fly into battle. Well, John rolled mainly 1s and 2s so crawled. 
Historically accurate, I'd say.


A ding-dong erupts between the T34s and Panthers. Panthers have the upper hand (boy they can hit hard and have good frontal armour.) Note the exceptional distance that the Tigers moved this turn. They redefined the word "slow". But the Soviets rolled well for reinforcements and 3x IS-2s appeared on Blinds and fairly rocketed down the road.


Nyet! Uh-oh, Panthers deploy in a wood off Blinds. 2 IS-2s are put out of action. As you can see, the Soviet armour is taking a pounding but some remarkably low hit rolls by the Germans saved the day. I've never seen so many "1s" rolled in succession like that before ... Meanwhile one scout infantry group is decimated in the church. Hey-ho, plenty more to replace them. 

It looked a bit bleak for the Soviets at this point but the chips came out en masse for them and swung the momentum back their way.


Surprise! Turns out that BA-64Bs can churn out quite a bit of damage on infantry in wooden buildings. No-one quite expected that. Several Russian units are now skulking in the graveyard. 
An apt situation to be in.


German Sturm Zug in the village is close to breaking. They quickly check their tactical doctrines and drill manuals, opting to hide under Hanomags. And the Dynamic Big Man dives under several Hanomags each turn to rally off shock. Top-left, 3x SU-85s swing around on Blinds to get a flank shot on the Panthers. The IS-2 explodes a Panther. Russian Blinds start to arrive in greater numbers. Will they be in time? Are they infantry? 
The Puma completes its first full circuit of the wood to the top left and bags a T-34 en route.


Other side of the table. SU-85s deployed. Spatz in his Puma looks worried. His chip came out next and he promptly skipped off around the wood again for a second time. Consensus was that he would have continued to do this all night if given the chance.


Ominous. The Russian steamroller finally arrives (back of table.) In a classic lardy moment, what will come out first? The chip for the Panther HQ in the woods or the freshly-arrived SU-85s? The smoke streaming from an SU-85 gives you a clue. Another of the SU-85s is immobilised.


Hard to see, but in the top-left the SU-85s get revenge and pick off a Panther. The second Panther (bottom left) goes up in smoke thanks to the lonely IS-2 on the road. A Schwerer Hanomag zug appears (centre of picture) and unleashes HE and MG fire into the church. Note the Tigers have bravely nosed forward an inch or two as well. 


Sound the trumpets! Dushkin's Tank Rota finally arrives beside the church. These T34-85s blow up a couple of Schwerer halftracks and "persuade" the others to zip backwards. The lone IS-2 is sitting amidst the burning wreckage of lots of Soviet tanks. It has an unfeasible amount of Tiger shells bouncing off it. One of the plucky Soviet Armoured Cars bites the dust (but not before unleashing another nasty round of MG fire into the German infantry in the village.)


Sound the trumpets, play the balalaikas! The Russian infantry arrive in trucks off Blinds. 
Predictably, they charge the Panther HQ in the woods. What?


The Tigers find their accelerators and, having seen off the final IS-2, obliterate the newly-arrived T34s. Alas poor Dushkin. His comrades are distracted by bits of T-34 thudding off their tanks. Ouch.


The Tigers take up a dominating position near the crossroads. 
The Soviets didn't have much left that could hurt them.


Meanwhile (above) the SU-85s dispatch the newly-arrived Panther zug. Bottom-left you can see Russian infantry trucks hurtling towards the Panthers. Top left, Spatz begins his second or third circuit of the woods (he stopped and reversed at one point, so it gets confusing.) 
His success is positively dizzying.


Heroic leader! After the remaining Panther shot up two of the trucks, the Soviet commander shouts "Uraiiiiiiiii" and leads his men on an assault into the Panther. Cue rummaging around the rules to find out what happens. It was very cinematic, totally unexpected, worryingly Eastern Front but in the end came to nought. The plan was to seize the woods and shoot up the Germans from behind which might just have worked.

The afternoon had flown by and it was rapidly approaching the witching-hour so we called it as a German victory and shook hands at that point. The Soviets had too little left to win the scenario or deal with the surviving German armour. The scout SMGs could have charged across the open fields from the church and sat on the junction for a technical win but that wasn't in the spirit of the game and seemed a bit unrealistic given that the Tigers were guarding the junction. 

The game was played in excellent spirit and I really could not tell which side would win. For the Soviets, Peykachu's Armoured Cars deserve a commendation. The sole undamaged IS-2 was effective. My man of the match goes to Spatz and his perambulating Puma. He spotted pretty much the whole Russian force and bagged a tank. The Panthers were very effective and the Tigers were very strong in the centre.

For the record, the Soviets lost 2 vzvods of T-34s, an HQ T-34, 3 IS-2s, a Maxim detachment and most of the SMG scout infantry, plus a few odds and ends. The German assault infantry zug was pretty much wiped out. They also lost 5 out of 6 Panthers and a couple of Schwerer half-tracks. They'll be lacking a bit of mobility and firepower as they push on with the attack but the Soviets would have conceded the ground. Then again, what's that coming over the hill? Is it a steamroller?


Spatz, in the Puma, enjoying his 3rd or 4th circuit of the woods, but grumbling at having to dodge an immobilised Panther which really took him out of his stride and denied him a Guinness Book of World Records 5th circuit.

Mat and scenery supplied by John, who is also a superb host.
Buildings = Timecast and minis by Heroics and Ros.

Friday 15 February 2019

Late-War Germans

Here's the German contingent. Again, all Warlord plastics and not bad at all. Some of the camo colours came out darker than planned but frankly I like them as they are for now! These chaps have performed well in Bolt Action and a few short trials of the CoC ruleset.

The Germans are led by Hauptmann Schweitensauer who tends to charge around with a machine pistol at his hip all day long (he's a distant relative of the Austrian Napoleonic officer from the Sharp Practice posts, but of course he seems to be more efficient). There are two sections and a few extras. I quite fancy supplementing these with some gebirgsjaeger because why not? And a tripod MG42, and a panzerschrek and an infantry gun and a Puma.

Ah, who am I kidding? I'll probably buy all that and change my mind and end up painting a batch of "Wellington/Wellesley in India" models for Sharp Practice (I'm looking at you, Redoubt Miniatures, why do you tempt me so?)


The Germans looking professional by fanning out but actually they haven't got a clue what the mission is or where they should be going.


Schweitensauer dips into a reconnaissance role. New hedges on each side - pleased with their effect.


It's 'faust time. Part One and Two. 


A couple of junior officers run over the bridge, leading some late reinforcements.


The heavy support Stug rolls up to a hedgerow before unleashing a devastating shot into the Sherman Firefly's rear-end. Just how I managed to park my Sherman in that particular fashion is a story for another day.

Tuesday 12 February 2019


IABSM 6mm - Bashnya or Bust 

Scenario 1: Near Osen


This is a great little scenario to kick off the campaign - not too long or complicated with only a couple of tank zugs/vzvods, a single infantry platoon and some recon on each side. We got through it in around 3 hours. The Soviets edge it a little with some air support and the T34/85s' superior stats over the Panzer IVs. Then again, the Germans benefited from better quality troops (more actions) and slightly better Big Men / Commanders. All in all, a balanced pair of OOBs.

The finer details are in the Bashnya or Bust! supplement (and jolly good it is too, bravo Mr Avery.) In brief, both sides needed to have infantry on the bridge (top-leftish in the photo above) by the end of the game. If no-one made the bridge, the force with more AFVs on the enemy's side of the table would win.

Below: the initial deployment of "blinds." We adjusted the scenario to allow one blind from each force to move up the shorter side of the river - just for a bit of variety and to see buildings in action. The Germans got the jump. That's the Assault Rifle gruppe moving towards the bridge. The other two are a Panzer zug (centre) and a "dummy" blind. The Russians led with a dummy, closely followed by tanks and a recon group on the far side. All blinds are included in the supplement. They look great on the table.


German tank blinds move into a small wood (below) whilst the Soviet recon group try some spotting. They identified several trees and a bit of wildlife. But they remained stoically underwhelming at spotting Germans.


The first shots are exchanged (below). The Soviets went for a mad tank rush towards the bridge in Napoleonic style (too much Sharp Practice methinks - ed.) They were easily spotted by the German infantry in the house by the bridge. 

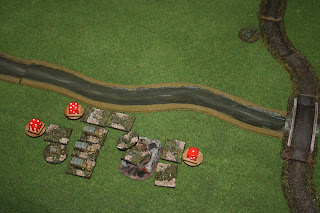
Panzer IVs deployed and brewed up a T36/85 and immobilised another for the rest of the game (the one sitting on the red circle.)


"Hans, this is so easy ..." The Panzer IVs use up all their favours with the dice gods to destroy another 2x T-34/85s and damage the turret of another (red circle with the dice behind it.) Must get some markers for these things! At this point, the Soviets considered throwing in the towel as they only had 2 undamaged tanks left and their infantry had not yet entered the table. A pot of tea and maybe something a tad stronger settled the nerves.


The Germans don't have it all their own way (above and below.) The heavier guns on the Soviet tanks punched through a Panzer's front armour. The Panzers returned fire but abysmal rolling (3s for every shot!!) led to the Soviet general needing a moment to wipe away the tears of laughter. It was a game played in good spirits, so everyone saw the funny side of it. 
I mean, 4 consecutive rolls of 3? I think they only needed a 4 to hit.


Meanwhile the Soviet infantry arrives. The Big Man clearly forgot he was meant to be riding tanks. He was summarily shot and replaced with a new lead figure who obeyed orders blindly and was therefore promoted at the end of the battle.


Well there goes that plan ... Below the Russian infantry is spotted loitering in a wood around a country mile from the bridge. It would take hours to get them moving again!


German infantry finally spotted (below.) The remaining Soviet tank in zvzod 2 zoomed across the bridge and took up position by a demolished house. A couple of rounds of HE later and the German infantry was starting to wobble. The German cunning plan to seize the bridge was now in tatters.
 Meanwhile, after their brilliant start, the German tanks took a pounding. The Soviet HQ tank obliterated the German HQ tank by tank. The HQ Panzer IV exploded in a rather dramatic fashion, spelling the doom of the chief Big Man. A foolish dash out into the open had left them hanging in a rather distasteful whirlwind of AP shells. The remaining Panzers in the wood were also destroyed in a single turn. The second and last remaining German Panzer zug sped into the trees and discovered some light Russian scout cars. They looked worried but the Germans had bigger fish to fry.


Below - Pop! The German Puma goes up in smoke (far side.)


HE and MMG fire pounds the German infantry into oblivion.


The Russian infantry leg it for the bridge. As ever in a lardy game, as the initiative swayed back and forth, it was that classic moment: whose chip would come out next? The Panzer chip would mean trouble for the Soviet footsloggers ...


But the Russian infantry Big Man's chip emerged first. He deployed his rustic charm to holler at his lads and get them moving towards that blinking bridge. We ended it at that point - time was nearly up and the Germans could not really see a way of turning this around (although another couple of T34/85s went up in smoke before the final Tea Break.)


Soviet AAR - Kapitan Evgeny Dushkin [sipping on a molotov cocktail]
Never give up, that's my motto (actually, it's get ready to chuck in the towel and ask for a rematch because nearly all my tanks got exploded so quickly, then forget all that because all of my chips came out in the right order - less catchy but certainly accurate). You just never know with this random activation. That's the beauty of it.

My unsophisticated patriotic rush for the bridge worked perfectlyish. The strategy was politically sound, based on the Soviet doctrine of stubborn sacrifice, and the tactical deployment of troops was first rate - at least it would appear so in the reports to HQ. But just between you and my un-tuned balalaika, I will confess I relied on a healthy dose of Uncle Joe's luck. We were carrying the Red Tsar's pipe into battle and after a vigorous session of rubbing it behind the trees, it finally poked the infantry into appearing and making a dash for the bridge. Luck was on my side. A lot of my chips came up and the German chips seemed to be MIA (ed - a couple actually were because they spent a turn in the box until we realised they were missing - must remember to add them when coming off blinds!!)

Lessons learned? Those scout cars are abysmal. T34/85s are not indestructible. Panzer IVs have a bigger punch than I expected. But T34/85s are remarkably good at blowing up Panzer IVs in return. Oh, and read the bit in the scenario instructions that says the infantry can ride tanks into battle. We'd have been at the bridge about an hour earlier!

We win! On to scenario 2A: Osen where we face 1001st Infantry.


German AAR - Leutnant Warsteiner, writing on behalf of Hauptmann Sauerbrauten KIA
Kerput! Mein kampfgruppe, what a nasty series of unfortunate events. In the first couple of turns I was as smug as a smuggy thing. My tanks could not miss, Soviet tanks kept exploding, my infantry was ready to swoop onto the bridge and I had more AFVs in winning positions than the Russkis. Then the red chips just kept coming, aided and abetted by devilishly untimely Tea Breaks. I hate tea. I mean, any self-respecting general would be drinking schnapps at times like this. Then to have my HQ tank explode (7 - count 'em - 7 unsaved hits on front armour. That's enough to kill it twice over) just rubbed salt into the wound.

Lessons learned? Infantry needs close support from AFVs (or other stuff.) Don't commit the infantry too early in a game like this. I didn't make use of the Puma at all. Oh, and try to get to the side of the T34/85s as that makes a kill very much more likely. I lost count of the number of times a good shot simply plinked off the Russian armour (lots of defence dice.) 

Ah well, the campaign needed a Soviet win to make it interesting. Let's see how Dushkin's tanks handle a face full of 'fausts and PaK 40s in the next one! Looking forward to seeing how the rules for FOOs work too.

For the record
All units by Heroics and Ros (great value for money and they paint up really well)
All scenery - houses, roads, river, haystacks by Timecast (really impressed by these)
Trees by Scenics
Hills by Citadel of yore with annoying skulls covered with putty
Tea Break provided by the dauntless Mrs B