Search

Tuesday 30 January 2018

Gangs for Dead Man's Hand

Who can resist a good old shootout among the tumbleweed and dust of the Wild West?

I fondly remember GW's Wild West games. Great fun. A year or so ago I picked up a few figures from Artizan Miniatures (great sculpts on the whole and a dream to paint) after being hooked by a game called "Dead Man's Hand". A few old skirmish photos and reports will no doubt follow.

I tried to tie the gangs together by colour but I wanted to keep their clothes somewhat random. The edges of the bases tie them together too, hopefully not too obviously. I guess this approach is a nice contrast to endless white and blue in the Napoleonic era or the various shades of WWII uniforms. It was good to paint individual characters for a change - I actually prefer that approach deep down. This lot are standing on an old Citadel hill. Remember those? Yes, like a lot of people, I covered over the skulls with flock ...


First up, Lucky Juan's Desperados


Joaquin; Cherokee Bill; Felipe de Mierda


Three Fingers; Kiko Lopez; Chucho el Roto


The Gunslinger and the Boss
Quick Draw Jose and Lucky Juan


The Cowboys/Outlaws, led by Belle Starr


Belle Starr


Ike "Kid" McMasters; Hoodoo Brown; Rattlesnake Dick Barters


Lame Jonny Donohue; Dutch Charley Burns; Pistol Zip Ellsworth


The Lawmen


Whoops, fuzzy
Ramblin Hoot Milton; Morgan; Virgil


Deacon Jim McCrea; Doc Bose Dalton; Cowboy?!


Wyatt; Texas Jack Reed

Saturday 27 January 2018

A Dry Run at Piessting

There wasn't quite enough time to complete the game, but it was agreed to give it a go and see how far we got. We may return to finish it. But at the very least it allowed a bit of an experiment regarding the Grenzers etc in the "defence in depth" scenario from the main rulebook.


A couple of things learned:

On the back of our games so far, I'd say that the cannon rules in Sharp Practice need a tweak (how does one cannon-ball end up killing soldiers from several groups in a line formation? I mean, wouldn't it plough through one area and "shock" the others?) With this in mind, we'll trial a rule that includes rolling for casualties as normal for the single targeted group of a formation, with "kills" on other groups on either side just counting as shock. This would represent the panic caused by the impact ... and maybe add a bit of balance to the cannon rules

If you are the defending army in this "defence in depth" scenario, there is no advantage to deploying early if the enemy has a cannon. The Grenadiers took another pounding, despite being in "hard cover" behind the bridge. Poor old Schiettekatte and his troops. It never rains - it pours!


The Battle - A Dry Run at Piessting


To earn a major victory, the French had to march up the board to capture the Austrian primary deployment point at the very back. The Austrians basically had to stop this from happening by defending their advanced deployment point on the right (the far side of the bridge of the river Piessting) and a shallow ford across the river on the left (behind the ruined church, top left of the photo above).

Major Volte-Face's French deployed quickly and a bonus move (4 flags) allowed them to fairly fly up the table from the deployment point (the ruined walls at the bottom of the screen, by the Italian cannon that you can just see poking it's nose out). In the shot below, Volte Face is trundling with intent towards a field of goats/sheep. He has a spot of worrying on his mind ...


From the Austrian end of the table (above)


(Above) The Austrian Grenadiers deploy to defend the bridge and their secondary deployment point. A foolish move really, as now they are a sitting duck for the artillery!


And the Grenzers grace the table, seen here about to hunker down in hard cover within the ruined church. They are egged on by the officer and sergeant figure from the jaegers. It's the hats, I just can't resist the hats ...


Sheep. Looking worried that they are about to be advanced upon from the rear by Major Volte-Face. The Grenzers find a comfy spot in the ruin to swig a quick bottle of wine before battle. This explains their shoddy aim for the rest of the battle. The main clashes were focused on the French left flank, with the Grenzers firmly in the firing line. In the next few photos, Major Volte-Face's fusiliers advance and deploy into line amidst the frolicking sheep before delivering a cracking salvo into the Grenzers in the ruins. Ouch! To add to the pressure, the voltiguers under Sergeant Blase (after deploying late, I mean turning up early is just too much hassle) whisk their merry way up the battlefield and join the fray against the Grenzers. The brave Grenzers are now outnumbered 3:1. Good odds, if you've been drinking wine in a graveyard for the previous hour. The shock and casualties pile up on the Grenzers. The hard cover is really saving them - the first kill being ignored each time.


Suddenly the focus switched to Captain Cliche's fusiliers who made a mad dash up the road in an attempt to seize the bridge. They unleashed their first-fire controlled volley (below). But of course, the ever-reliable Hauptmann Hamsarni and Sergeant Mustard had already loosed a first-fire controlled volley of their own which had devastated the French ranks (look at the left-hand group which has already lost 4 killed and is teetering on 3 shock). 


The next chits were vital - Hamsarni yelled something agitated in Hungarian as two red flags emerged - Sharp Practice! The second volley was not as impressive, but inevitably Cliche's men began to withdraw. He spent the rest of the game creeping (sheepishly?) away back down the road before consolidating his remaining command into one group and a bucket-load of shock.


The game was punctuated by the regular boom of Sergeant Flatulento's cannon (below). By the end of the game it had whittled the Hungarian Grenadiers down quite considerably and this saved Captain Cliche's bacon and backside. Flatulento had roped in a drummer to help load the cannon. Flatulento proceeded to sing a traditional Italian falsetto battle-hymn to the annoyance of all and sundry.


Cliche about to consolidate and rally his remaining command. Not many left by this stage ... he spotted a wooded area and squatted there for the remainder of the game, gnashing his teeth and wailing uncontrollably into his boots.


Meanwhile, the Grenzers managed to snipe away at their foes but to no real effect (below). Another couple of volleys later and they were off back to the river, tail between their legs. The heroic Captain Longabuscu and his side-kick, Corporal Curlicu, did their best to rally the men. So in true tabletop style, the freshly-painted unit was devastated and pretty useless! I suppose they slowed down the advance ...


"Bad things happen" rolls. The Austrians' morale is beginning to dip. Next: the Grenzers consolidate behind the church ruins. And more wine for Curlicu. The Grenzers behind the river have been killed - but being pretty and all, they hung around on the board to add to the general confusion.


Volte-Face had been quiet for a couple of rounds (below). Note the lack of sheep at this stage - thoroughly troubled no doubt by Volte-Face's legerdemain. But with time ticking, he shoved a couple of sheep into a shed for later and got back to booting his fusiliers up the board. They advanced on the river and ... we had to call it a day.


Colonel Schiettekatte had declined to deploy with the Austrian fusiliers - even at this stage - as the Austrians still had 3 deployment points to play with. The Austrian morale was falling and Captain Cliche had rallied his men (and was heading for cover to avoid any more casualties). On balance, the Austrian forces had slowed the French advance but I reckon another couple of turns would have made the difference. Only a devastating first-fire volley from Schiettekatte's fusiliers against Volte-Face's pretty much untouched units could have swung it towards an Austrian victory.

Dispatches:

Volte-Face: Tres bon. I have a nice set of woollies to keep me warm for the rest of winter. Our boys performed better than anyone in the world, ever. Sure, Cliche got a bit excited and charged ahead in the hope of standing heroically on the bridge with his sword in the air (dramatic). Sure, he had virtually no-one left at the end. But my boys and the voltiguers made mincemeat of the Grenzers. Kudos to the Italian cannon and their consistent hammering of the Hungarian Grenadiers behind the bridge. Very handy indeed. Two more turns and we would have captured their deployment zones. Vive L'Empereur!

Schiettekatte (from a cafe in Vienna): What? There was a battle, you say? Well undoubtedly Hamsarni and Longabuscu fought valiantly to the last man. Now I'm rid of them I can claim their weekly pay ... what? They didn't die and didn't necessarily lose? Possibly a draw? What is a draw? Isn't there overtime or extra time? No, I don't think it was a bad idea to deploy the 12 Grenzers against around 40 soldiers on our right flank. They were fine. Just a few scratches. No, I don't think it was a bad idea to deploy the Hungarian moustaches at the start of the game behind the bridge. What do you mean a cannon reduces the level of cover? Surely those moustaches count as extra cover? Bah, bring me a bratwurst, boy, you know nothing of soldiering and linear tactics!

Sunday 21 January 2018

Austrians - update - Grenzer roll in

Snow and ice in Hibernia - so the push to the River Piessting has been postponed owing to weather. That's what you get for campaigning in January ...

Still, I found time to finish off these Grenzer skirmishers (Perry Miniatures) to boost the Austrian options. [ed: thanks Gonsalvo for pointing out the correct spelling) They should add a strong skirmishing element for Sharp Practice games. As much as I love the rifle-armed Jaeger models, they are expensive points-wise and really need the Sharp Practice chits/cards to make them operate effectively each turn. Plus they were annihilated in the last game. These new Grenzer offer a different angle - shorter range, more firepower, more ground covered and a quicker re-load.


Grenzer seem to have been on the wilder side in terms of drill but they were effective at their jobs and particularly "warlike" in their approach to skirmishing. Based on what I've read, I've rated these Grenzer as "aggressive" (a bit of an advantage in melee) and they have the "sharp practice" trait (with the right cards, they can take an extra reload or fire action) and they come with a "moveable deployment point" which allows them and units following them to get up the board a bit/lot quicker if needed. They have the Skirmisher rules which allow bonuses in hard cover and they can screen other units. All in all, handy chaps to have on the team!


This group is based on the 14th Border / Grenzer regiment, raised in Romania I believe. I couldn't resist the challenge of painting brown coats with pink turnbacks, bright blue trousers with yellow trim and red overcoat/bedrolls. The black strapping maybe doesn't stand out as I'd hoped but again it makes a change from off-white. The varnish seems to be shinier on these models than any of the others. Not sure why it set like that! Maybe I needed to shake up the bottle a bit more. Anyway, they're robust. I've already dropped the lot on the floor ...  


Of course, if we're "larding it up" (Too Fat Lardies' rules - look here) then the Grenze leader needs a name and backstory. So ... introducing Lieutenant Longabuscu, a Romanian partizan leader who has signed up (with his gang) to the pay of the Austrian empire because he's tired of waiting around. He's spent years protecting the borders from Turkish incursions but with Napoleon's invasion from the west and the crushing blows that Colonel Scheittekatte has suffered so far, the 14th Grenzers have been sent to defend Gross Lardsdorf. He can be supported by Corporal Curlicu if needed. The Grenzer are rushing up to the River Piessting and may make the next engagement if their powder (paint?) is dry. So, with facial hair in full force and madcap uniforms on display, I fully expect them to fail spectacularly in their first outing (as all freshly painted miniatures are doomed to do).

I suspect the Austrian force for the next battle will therefore change to something like:

Unit
Points
German Fusiliers x3 (24)
Leader Level III (Colonel Schiettekatte) #1
Leader Level I (Sergeant Fahrt) #2
12
9
3
Hungarian Grenadiers x2 (16)
Leader Level II – (Captain Hamsarni) #3
Leader Level I – (Corporal Mustard) #4
16
6
3
Grenzer Skirmishers x2 (12)
Leader Level II (Lieutenant Longabuscu) #5
Leader Level I (Corporal Curlicu)#6
16
6
3

71

Sunday 14 January 2018

Another Sharp Practice II game - Defence in Depth across the River Piessting

Preparations for another game are underway. With Schiettekatte losing heavily last time, he's been forced to set up a hasty defence of a bridge over the River Piessting, just outside Gross Lardsdorf.

This is based on scenario 3 of the main Sharp Practice II rulebook by Too Fat Lardies (page 73). There is a great report of this scenario on their blog which is designed to introduce the game. 

The French objective is to drive the Austrians from the bridge area and capture the "primary deployment point" at the back of the Austrian board edge. We've agreed that the Austrian-Hungarian force will win a major victory if they destroy the French force morale or manage to hold both the forward and rear deployment points to the end of the game. They can win a minor victory if they hold on to the primary (rear) deployment point. It isn't necessarily a balanced scenario but it makes for an interesting game. The Austrian cannon and Grenzers are not yet painted (perhaps they are lost in Gross Lardsdorf), so old Schiettekatte will have to make do with a similar set-up to last time.

The Force lists:

French: 70 points
3x8 Line Infantry = 12 points
Major Volte-Face (level III) = 9
Sergeant L'Excraimont (level I) = 3

2x Line Infantry = 8
Captain Cliche (level II) = 6

2x Voltiguer Skirmishers = 14
Captain Blase (level II) = 6
Sergeant Paul-Tron (level I) = 3

Light Artillery = 6
Sergeant Flatulento (level I) = 3


Austrian: 70 points
3x8 Line Infantry = 12 points
Colonel Schiettekatte (level IV) = 12
Korporal Fahrt (level I) = 3

2x8 Grenadiers = 16
Hauptmann Hamsarni (level III) = 9

1x6 Jaegers = 11
Lieutenant Schweitensaur (level II) = 6

1x 4" Barrier = 1 point


Saturday 6 January 2018

Austrians and Hungarians c1809

Having overcome snow-blindness and stuck grimly to the task of painting different shades of white which, to the naked eye, are nigh undetectable (but at least I know the cross belts are different to the uniforms - hmmm), the Hapsburg Austrians and Hungarians are done for now. All the figures are from the Perry range - plastic Fusiliers and the rest are metal.

I used the Sharpulator to create the Austrians for 1809, basically to suit some background info I was reading on the historical events. I'm sure someone has already put together something like this, but I also wanted to try out different types of units in Sharp Practice (the French are all Conscripts and Volunteers so far). Whilst it might not be fully balanced, I'm not really looking for that. I did make a change after the test games - reducing the Fusiliers to the same standard and cost as the French. "Paying" extra for the "regular" status didn't really seem right or work well in practice.

As an homage to Too Fat Lardies (https://toofatlardies.co.uk/) who invented the great game Sharp Practice, the characters' names are somewhat silly and are not intended to be offensive ... they just appeal to my daft sense of humour.

First up Oberst (Colonel) Scheittekatte (Level III) and his merry band of 24 Austrian Fusiliers. I eventually settled on rating the Fusiliers as "conscripts and volunteers". They're stubborn - probably controversially - have first fire and only 1 controlled volley. It seems about right. I don't want them running off too quickly or being significantly stronger than the French infantry. Scheittekatte went through a phase of doing no wrong. He really was the dog's business, or the cat's whiskers given his name. But his most recent foray (to clear French out of a ruined church and strategic bridge) confirmed that it is not such a good idea to march blindly into volley range of the French infantry and cannon, even if they look weaker on paper. Scheittekatte is ably supported by Korporal Fahrt (Level I) a silent yet deadly chap who rallies off a bit of shock in his characteristically breezy manner.

Austrian Fusiliers - Perry plastics

Colonel Scheittekatte and Corporal Fahrt. 
They are trying to look confident about which way to go.

I couldn't resist some Perry Hungarian Grenadiers to add a touch of colour and panache to the force. This choice was inspired by the stories of Hungarian troops holding out against the Grande Armee on several occasions. The French seemed to have really rated them (and the Grenzer) judging by the number of false claims of captured Hungarian Grenadiers that appear in reports home. So here they are, led by the flashing blade that is Hauptmann (Captain) Hamsarni (Level II). This unit isn't fond of their Austrian masters but they clearly hate the French invaders a little bit more (the Grenadiers seem to have a tendency to surge forward and save the day with an unexpected charge on the random events table). I've rated them regulars as most Grenadiers seem to be that grade in Sharp Practice. They have the other bells and whistles, including unlimited controlled volleys which can make a real difference later in the game. I'm tempted to give them a Sergeant to keep them in the fight a little longer as they do attract a considerable amount of attention from the enemy.

Perry Miniatures - Hungarian Grenadiers


Drummer and Sapper

The dashing figure of Hauptmann Hamsarni, pointing doggedly to his preferred picnic spot

Finally, the rifle-armed Jaeger skirmishers whose hats are joyfully ridiculous and surely impractical on every level. These were a real pleasure to paint but getting the shade of blue-grey right was a bit of a struggle. For Sharp Practice, one of the Jaegers is marksman because they need to do damage given their steep points cost and their small numbers. They are led by the somewhat unpredictable Oberleutnant Schweitensauer (Level II) whose leadership approach isn't exactly to everyone's taste. He tends to pour on fire once he finds some cover.

Jaegers with rifles. And hats.

Oberleutnant Schweitensauer, seen here in traditional pose, 
looking for his troops (they are hiding under the bridge)

There's also a spare plastic officer, Major Schoppen Von Aldi. Just in case ...


The rough "core" force as it stands:

Unit
Points
German Fusiliers x3 (24)
Leader Level III (Colonel Schiettekatte) #1
Leader Level I (Korporal Fahrt) #4
12
9
3
Hungarian Grenadiers x2 (16)
Leader Level II – (Hauptmann Hamsarni) #2
16
6
Jaeger Skirmishers x1 (6)
Leader Level II (Oberleutnant Schweitensauer) #3
Sharpshooter
11
6
Support
Musician
Sharpshooter

1
1


65

There are some Grenz(er) infantry waiting in the wings to bolster the skirmish element, as well as a sizable block of militia in gloriously floppy hats. There is a 6lb cannon and crew to round off what I hope will be a suitably varied force which will make for some interesting "large skirmish" games.

Thursday 4 January 2018


A spat over Gross Lardsdorf

28mm Napoleonic using Sharp Practice II. Time to give the rules a spin. Just an engagement encounter to get the basics sorted. The loose narrative: a French force led by Major Volte-Face is scouting the land around "Gross Lardsdorf", somewhere in Upper Austria. Colonel Schiettekatte has been rudely plucked from a Viennese whirl and tasked with chasing the invaders back to Paris.

Austrians:

Unit
Points
German Fusiliers x3 (24)
Leader Level III (Colonel Schiettekatte) #1
Leader Level I (Sergeant Fahrt) #4
15
9
3
Hungarian Grenadiers x2 (16)
Leader Level II – (Captain Hamsarni) #2
Leader Level I – (Corporal Pikkle)   #5
16
6
3
Jaeger Skirmishers x1 (6)
Leader Level II (Lieutenant Schweitensauer) #3
11
6

69


French:

Unit
Points
Line Fusiliers x3 (24)
Leader Level III [Major Volte-Face]
Leader Level I [Sergeant L’Excraimont]
12
9
3
Light Infantry Chasseur in Line x2 (16)
Leader Level II [Captain Cliché)
12
6
Voltigeur Skirmishers x2 (12)
Leader Level II [Captain Blasé]
14
6
Artillery
Leader Level I [Sergeant Flatulento]
6
3
Total
71

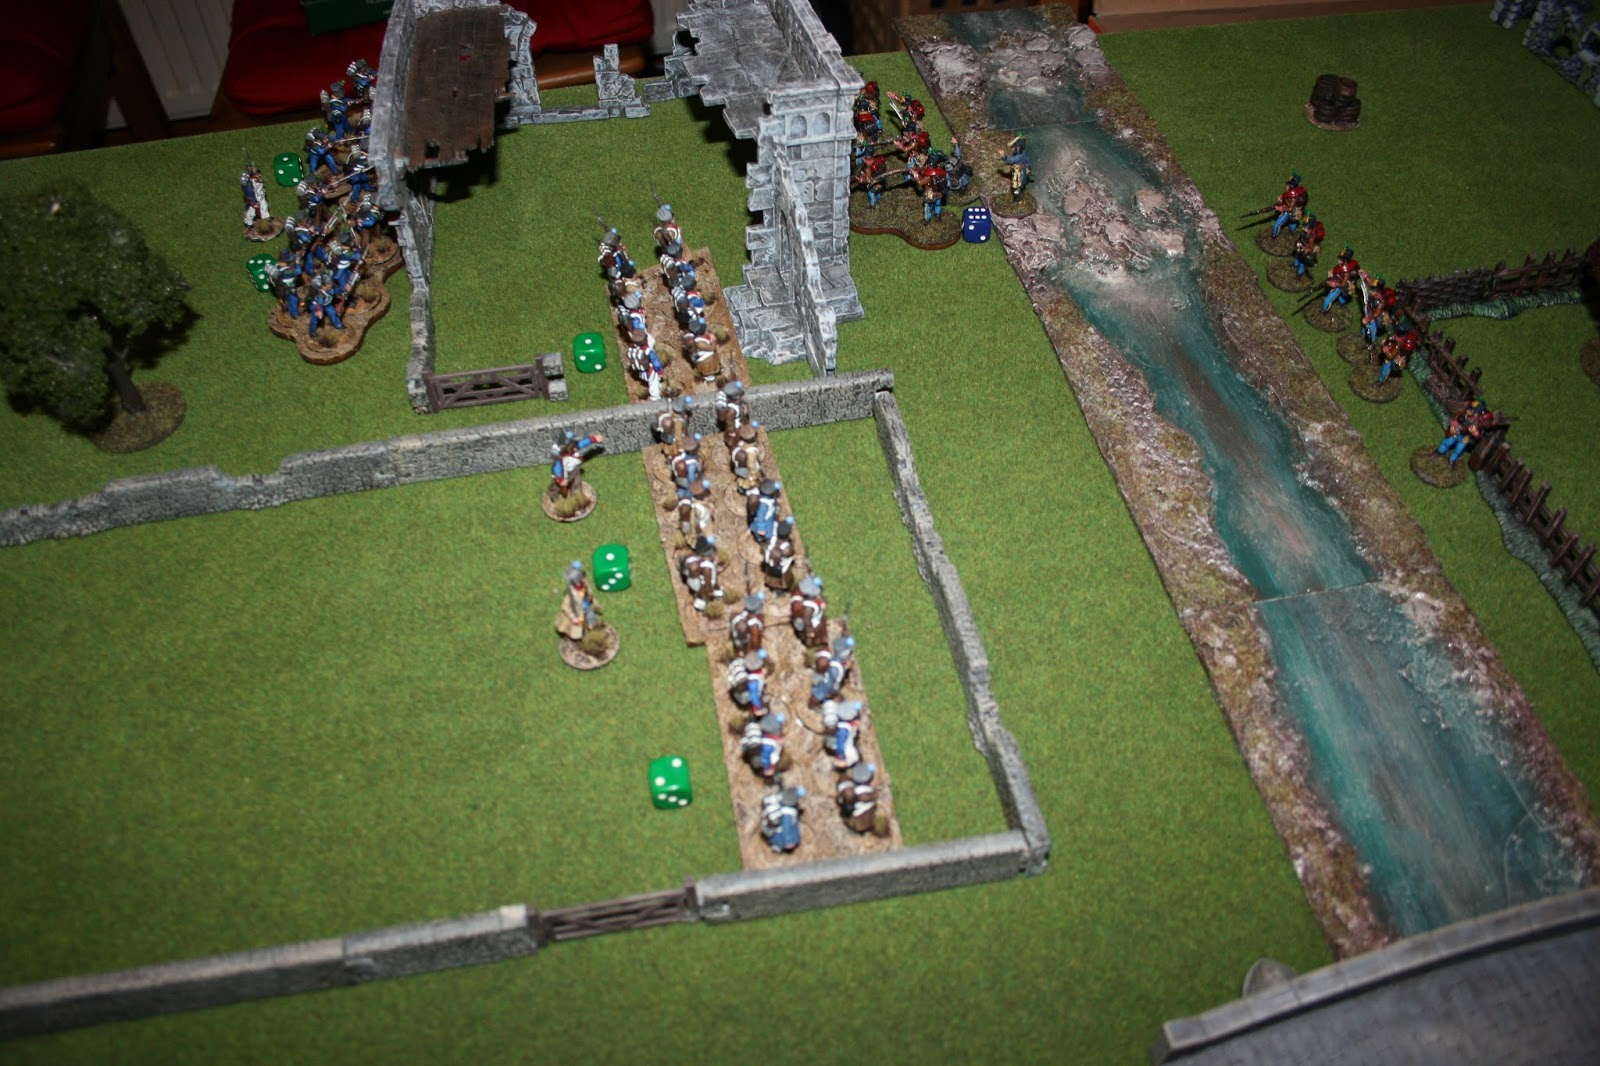
The battlefield featured some walls and fences, just to see their impact, and a fair amount of open ground in the middle. A ruined house and church, and a few new trees were added for flavour and there was an impenetrable forest on one board edge.


Turn 1
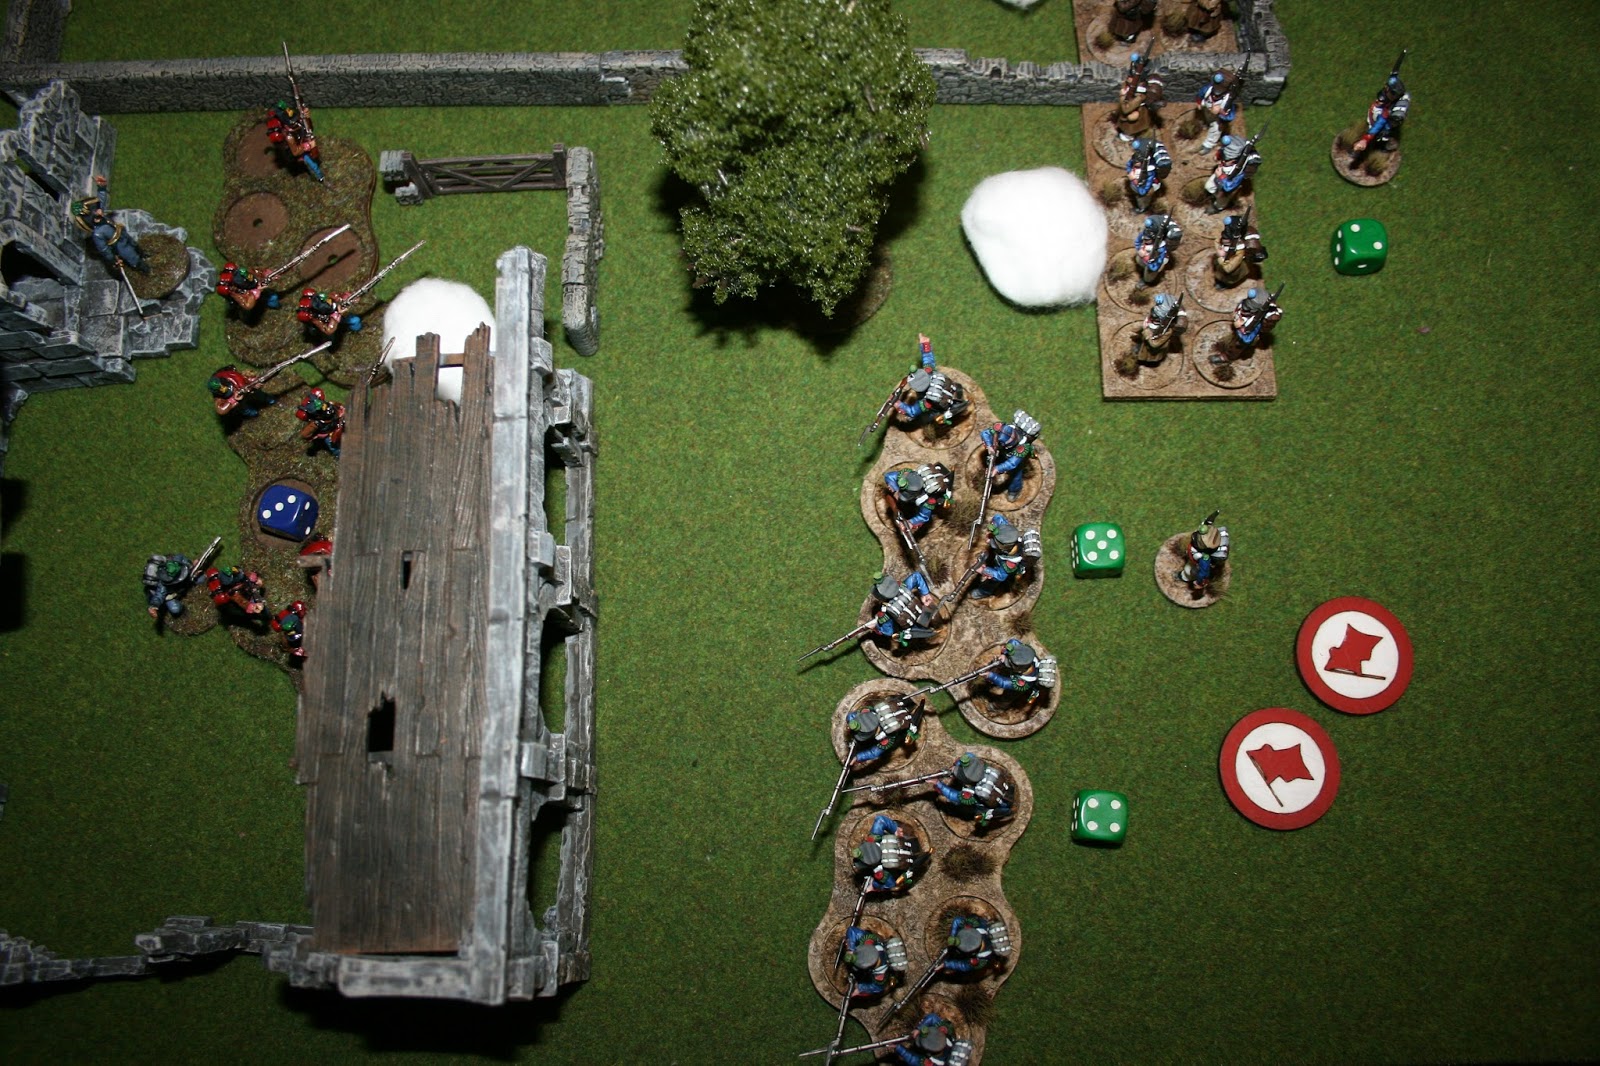
Deployment was speedy. Remarkably, every leader's chip came out of the bag except for Captain Cliche (French leader 2) before Tiffin. The good Austrian Colonel's eyes nearly popped out of his head as he found himself holding 4 flags - a bonus move for all his deployed troops! Smattering his soldiers with a liberal dusting of biscuit crumbs, Colonel Schiettekatte stole a march and bellowed for his army to advance up to the centre of the board. Captain Hamsarni, commanding the Hungarian Grenadiers ("anchoring" the Austrian left flank in the pictures above) noted with alarm that his bravely moustachiod and be-hatted troops were left in the open and facing a cannon loaded with canister. Exhausted after the forced march and his blood-sugar levels at a low ebb, Schiettekatte stood at the fence for the next couple of turns and did nothing (his chip failed to emerge).

Lesson 1: don't advance in a long line with your best troops out in the open with no real target ahead of them except a freshly loaded cannon.

Lesson 1a: the cannon should have deployed touching the deployment point, not 6" away. This might have made a difference to the game, but hey, it made for a good narrative.


Turn 2
Captain Blase moved his 12 skirmishers up to the fence beside the ruined house to pepper the Austrian Fusiliers and screen Volte-Face's 24 Fusiliers. Captain Cliche's unit arrived (late as usual, with a sausage sneakily stolen from a peasant's larder) and skirted the house to come around on the Austrian right flank. Fumes wafted from Flatulento's cannon as it roared in anger, surprisingly missing the right group of Grenadiers but killing one and causing 6 points of shock (rallied down to 5 in the picture below) on the left hand group which was already close to withdrawing. Would Hamsarni's Grenadiers cut the mustard? In a blind panic, they returned fire at the cannon (in retrospect a waste of time) but it was all smoke and noise. This was followed by a bit of sniping from Schweitensauer's jaegers who remained glued to the fence for the rest of the game. Tiffin.

Lesson 2: don't rush to deploy - with the Austrians in place and up the board, the initiative swayed to the French.

Lesson 3: think twice about shooting at cannons - it takes a heck of a lot of shock and kills to reduce their efficiency.

Lesson 4: don't forget the light infantry's free move. The jaegers should have tried to flank the French - a devastating first fire in the flank of the skirmishers or fusiliers may have been better than picking off a few French skirmishers at this stage.


Turn 3

Says it all. End of the Chapter and a lull in the battle. Everyone reloads but it's too early in the game for much else to happen at Tiffin. Schiettekatte lost focus, distracted by a tasty sachertorte he discovered in Korporal Fahrt's knapsack. Volte-Face, meanwhile, suddenly realised that he could have commanded Blase's Skirmishers to get out of the way of his Fusiliers. Instead, we ended up with the all-too-familiar Parisian traffic jam. He jumped up and down on his sword and hat in frustration. Zut alors!

Lesson 5: the commanding officer can use activations to order other units and leaders around him. Must make a note of that somewhere ...

Turn 4

Hamsarni, tired of standing in an open field and being shot at by everyone, grabbed two flags and shouted "Sharp Practice" in perfect Hungarian. The Grenadiers duly levelled their muskets at the main French force in and around the ruined farmhouse. They can present and fire, so they did more damage than was expected, particularly to the skirmishers. Volte-Face's chit appeared next. In hindsight, Schiettekatte should have interrupted but that's life. And the Grenadiers took a pounding. Hamsarni was hit. He made a lucky swift recovery but the Austrian force morale took a blow and the Grenadiers were again close to snapping. But like a phoenix rising from the ashes, Hamsarni was having none of this nonsense (this may have happened next turn - ed). He nabbed the remaining two flags and the familiar Hungarian battlecry of "Sharp Practice" rang out again. The pressure was piling up on the French centre, with Fusiliers dropping despite being in hard cover and Skirmish screen close to popping. 


Lesson 6: remember that the first kill on skirmishers is ignored in hard cover (I assume that this is genuine hard cover, rather than their ability to turn soft cover into hard cover). Very handy. Side note: it seems walls are soft/light cover and I can see why for this particular game system).

More volleys were exchanged in the centre but they did not come to much. The turn ended with a sneaky move from Captain Cliche who grabbed two (not the one in the photo below) French flags and with a cheesy yell of "Vive L'Empereur" declared a Pas de Charge which moved his Chasseurs in Line up around the ruined house and into the firing line. He squeezed in beside the fence to have a good natter with Volte-Face before the next turn.


Turn 5
Two French flags and Tiffin. Cliche's unit fired (1st Fire) causing a good amount of shock on the Austrian Fusiliers. Schiettekatte was saved from a wound by a particularly stodgy spinach dumpling. Then, the move of the match. Blase's skirmishers were activated and crabbed their way across to the left with an unfeasible roll. They blocked the cannon, but the fresh Fusiliers were able to move forward into the firefight in the centre. Of course, Flatulento's chip (the cannon) came out next, so the Italian was forced to swear loudly, hurl his sword to the ground and stamp on his crew's hats in frustration. Having blown off, Flatulento set about reducing some shock and then spent the rest of the game weeping softly as his chip did not come up again.

Lesson 7: Technically, this was three flags in a row over two turns. Should that be a roll on the event chart? It seems so. But with the luck firmly with the French, I imagine it would have just reinforced their dominance!


Turn 6
All hell breaks loose. In the centre, the French Fusiliers poured a volley into the Austrian Fusiliers who finally withdrew, with Korporal Fahrt desperately trying to pump them up for another round. Meanwhile, the Voltiguers were caught in the open by an aimed volley from the remaining Hungarian Grenadiers. This decimated one group and they were forced to hop over a handy wall in disarray.


Cliche's Chasseurs in Line deliver another galling volley into the Austrian Fusiliers, causing another withdrawal. Farht is heard to comment that the Austrian dice rolls stank and he'd be right. Schiettekatte was doggedly looking the other way but his own group was close to withdrawing. A bonus activation sees more fire directed at the Austrians who withdraw again and are close to breaking.


Schiettekatte was openly praying for a Christmas miracle, but Cliche had other ideas. Once again grabbing 2 flags, he used the Pas de Charge to steamroller Schweitensauer's jaegers who were annihilated (meeting a charge without bayonets, unloaded and outnumbered = bad things happen). Cliche adopted an heroic pose over the badly wounded body of Schweitensauer, which was rubbing salt into the wounds, and really rather uncalled for.

Lesson 8: light infantry skirmishers can and should evade a charge. But fisticuffs was fun ...


At this point, Schiettekatte caught wind of Fahrt's suggestion that it was time for supper back in Vienna and with uncharacteristic speed made for the table edge. With the Austrian commander out to tea, the Fusiliers in tatters and the jaegers obliterated, the game was called at that point. The French morale stood at 7, the Austrians down at 1. A resounding victory to the French!


Reflections:

Schiettekatte (between mouthfuls of sauerkraut): I was magnificent, but I need new dice and a different person pulling chips out of the bag. End of report. Oh, I suppose the jaegers might have worked better on the right flank, supporting the brave Grenadiers and forcing the French to make more choices. But did I expect them to hunker under a fence all game? No. Schweitensauer will pay for that. And Hamsarni's Grenadiers really should not have walked into an open space and stood there, blazing away and twirling their moustaches. I would move them more and fire less if I had this over again. No need to rush up the middle, either. I blame that Fahrt. Now, where's the nearest cafe?

Volte-Face: (preening himself) this affair was as easy as eating breakfast. Ha, good one. Must put that in dispatches. The skirmish screen worked really well, harassing the Austrian centre and protecting the Fusiliers. They pinned old Schiettekatte in place, allowing Cliche to live up to his name by arriving late and pas de charging his way around the board, before delivering an awesome volley and charge. The cannon proved a useful distraction and mauled the Grenadiers. Definitely one to try again.